Claude Code launched GA on May 22nd, 2025. It’s an advanced agentic coding tool that operates from your terminal. Claude Code allows for fully hands-off development, as it can navigate your filesystem, make commits, read files for context, visit docs, and execute commands on your behalf (every action requires your explicit permission, of course). As of June 4th, 2025, Claude Code is included in Claude Pro and Max subscriptions.
We wanted to build a Docker Compose-enabled full-stack app. Here’s how we did it.
Putting Claude Code to the test
There’s been a ton of buzz around Claude Code lately, and we see why: it’s super capable and has a great UX. Anthropic is already known for being best-in-class when it comes to models, so it’s natural they’d want to combine that with their own agent offering.
We wanted to see how Claude Code fares when faced with intensive programming tasks. Right now, when you launch Claude Code, it recommends only using it to generate small features/fixes. Naturally, we wanted to see how far we could take it, by using it to build and iterate on a full-stack app.
Overall, we were pretty impressed! It took about 15 prompts to get a working MVP application. Claude Code didn’t disappoint. As the application got more complex and deviated from the original prompt, it became buggier. This makes sense, since the first few changes were pretty large-scale, and required hundreds of lines of code to be updated. Big feature overhauls meant we couldn’t be specific enough in our prompts to give Claude the context/guidance that an LLM needs for such tasks. However, after feeding it any resulting error logs, Claude Code could fix most bugs in 2-3 prompts.
What models does Claude Code use?
Like Claude Chat, Claude Code cycles between a few different models. It determines which one is best-suited to handle each specific request. You can see this from your Anthropic Console: it’ll show you every request (by ID, timestamp, input length, and output length), and which model it used.
At the time of writing this, Claude Code uses:
- Claude Haiku 3.5
- Claude Sonnet 4
- Claude Opus 4 (only in Max subscriptions)
Opus is Anthropic’s flagship model for programming tasks, which is why its restricted to the more premium tiers. Haiku is incredibly fast, and Sonnet picks up when tasks are more complex and/or need stronger reasoning.
The initial prompt
LLMs thrive with lots of specificity. Unlike your engineering colleagues, an LLM can’t infer what you mean when you make a vague feature request. It might jump to its own conclusions based on what it’s seen in the past, so if you have a specific architecture in mind, tell the LLM explicitly.
Our architecture
We wanted to start out with a simple, maintainable architecture. We settled on a React frontend, Django API, and Postgres database. Our main requirement was using Docker and Docker Compose for containerization and orchestration, so we could easily run this app anywhere.
Our app’s concept
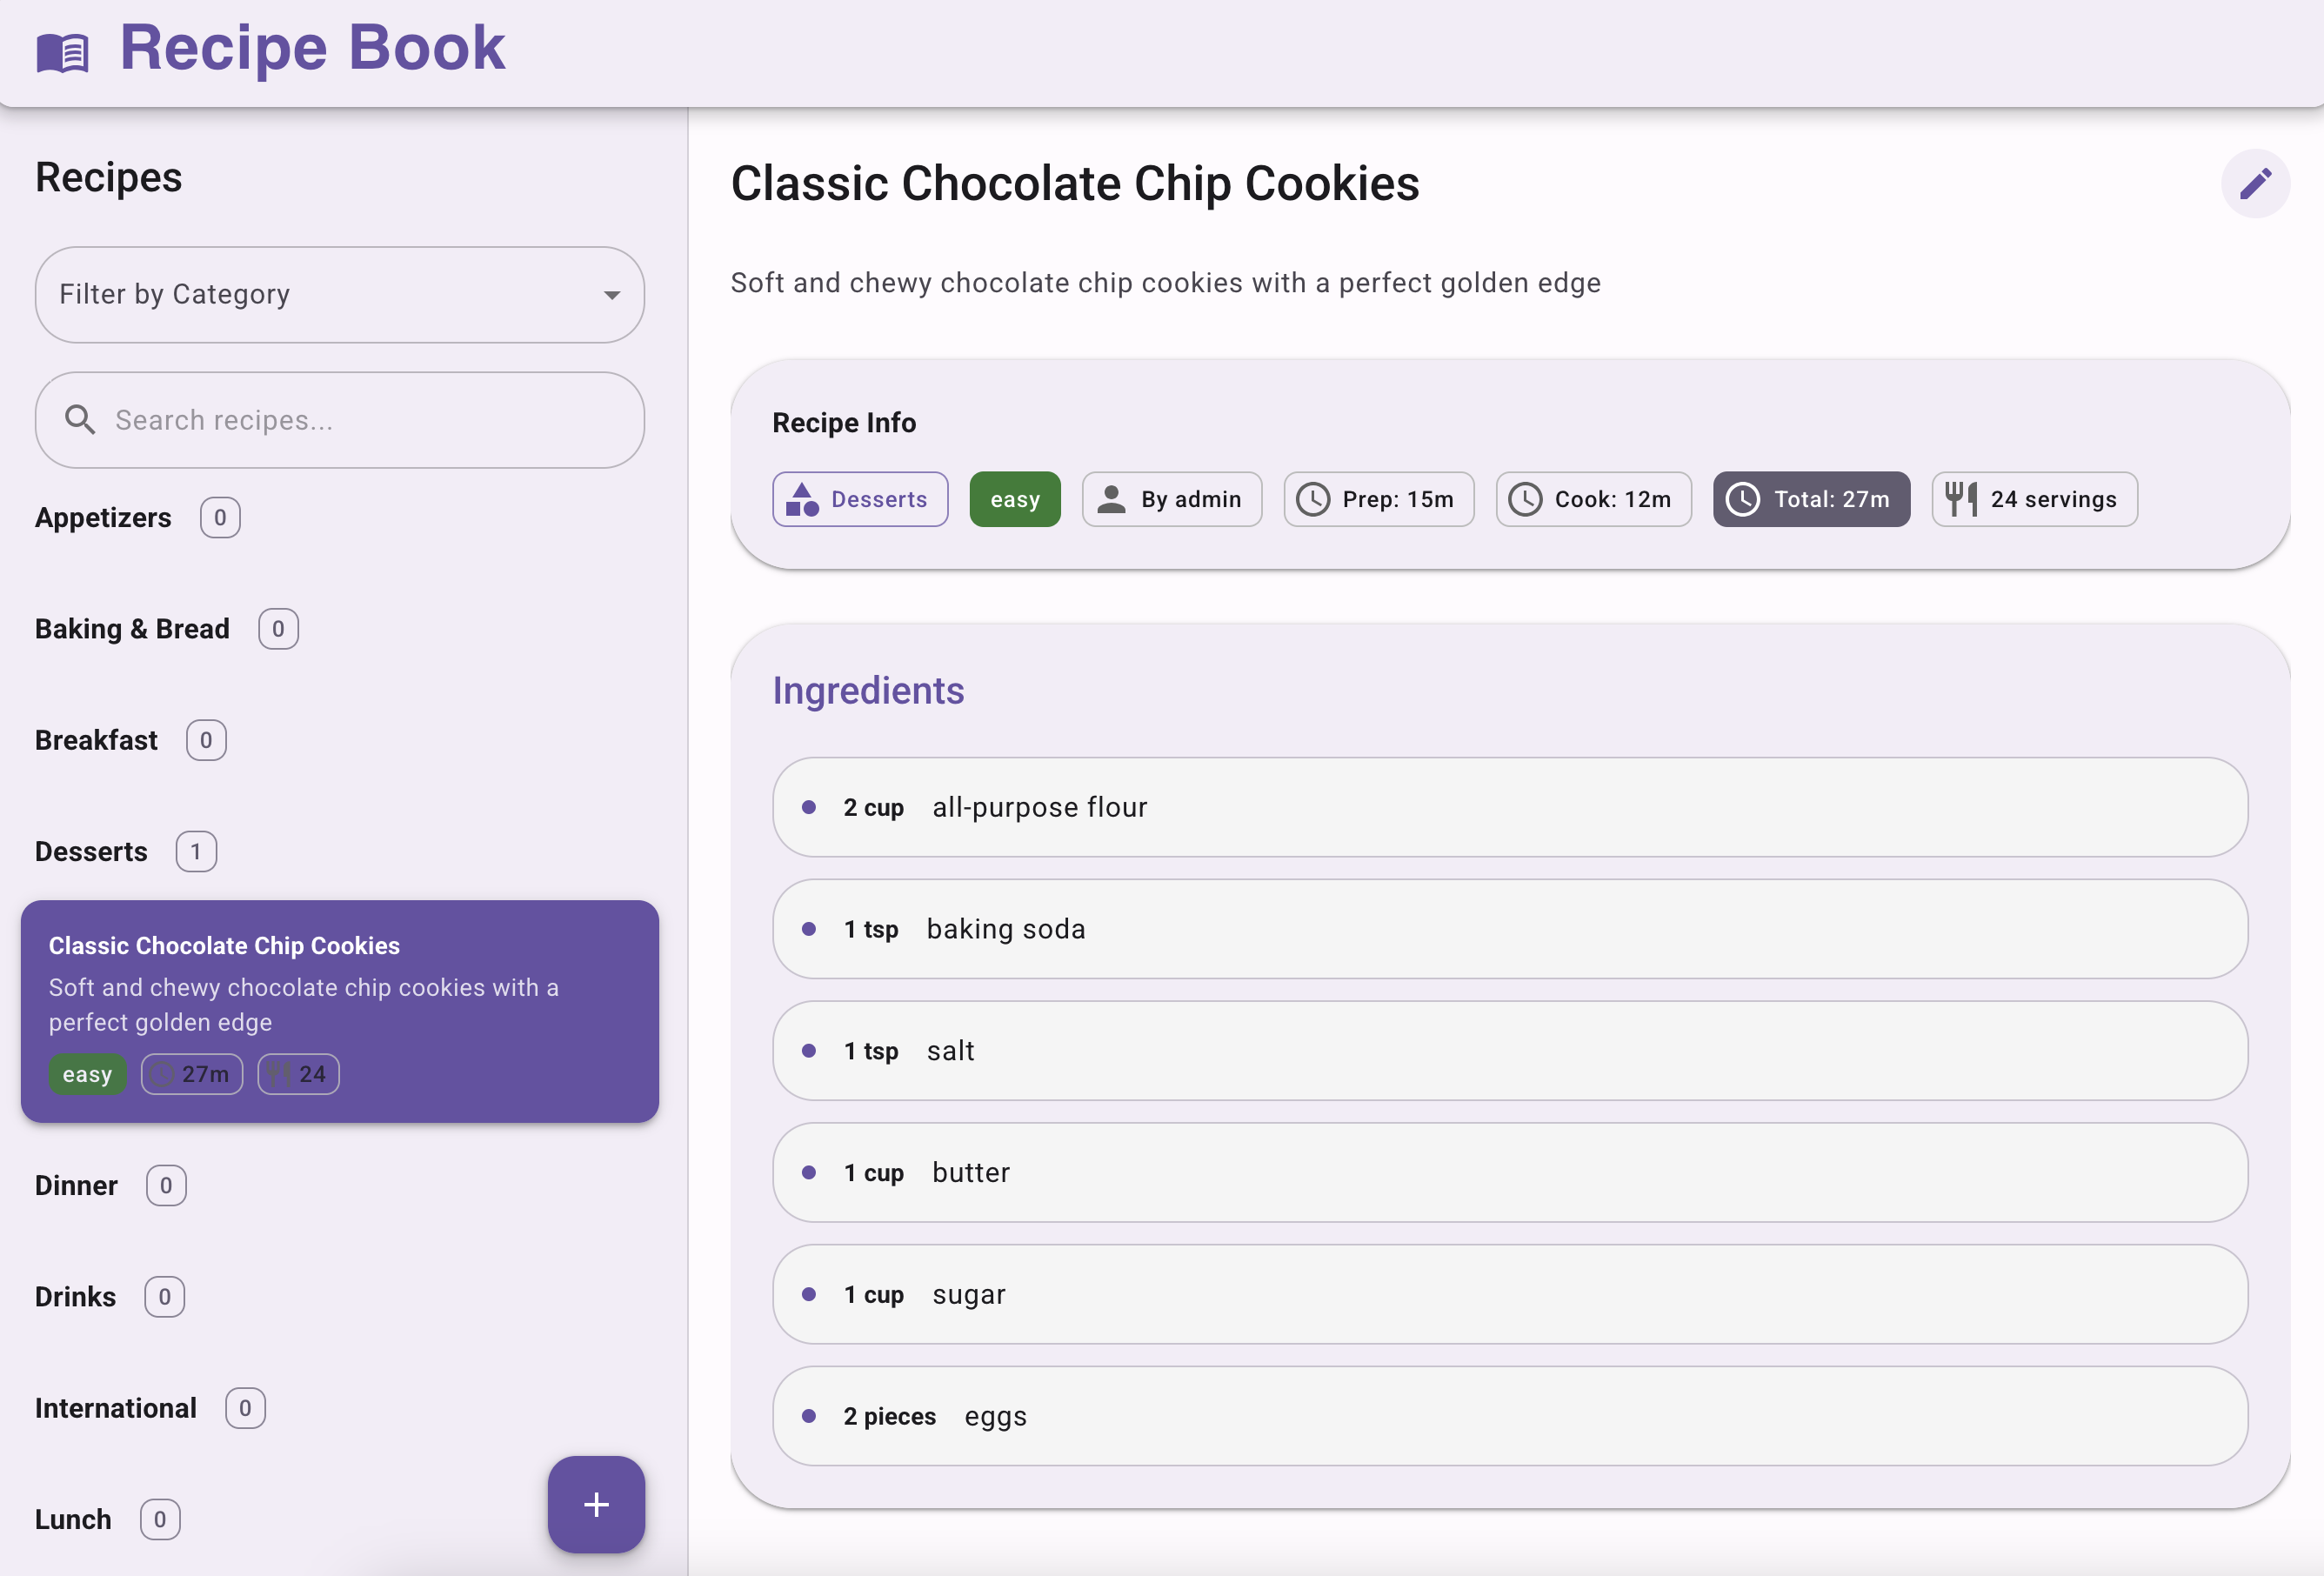
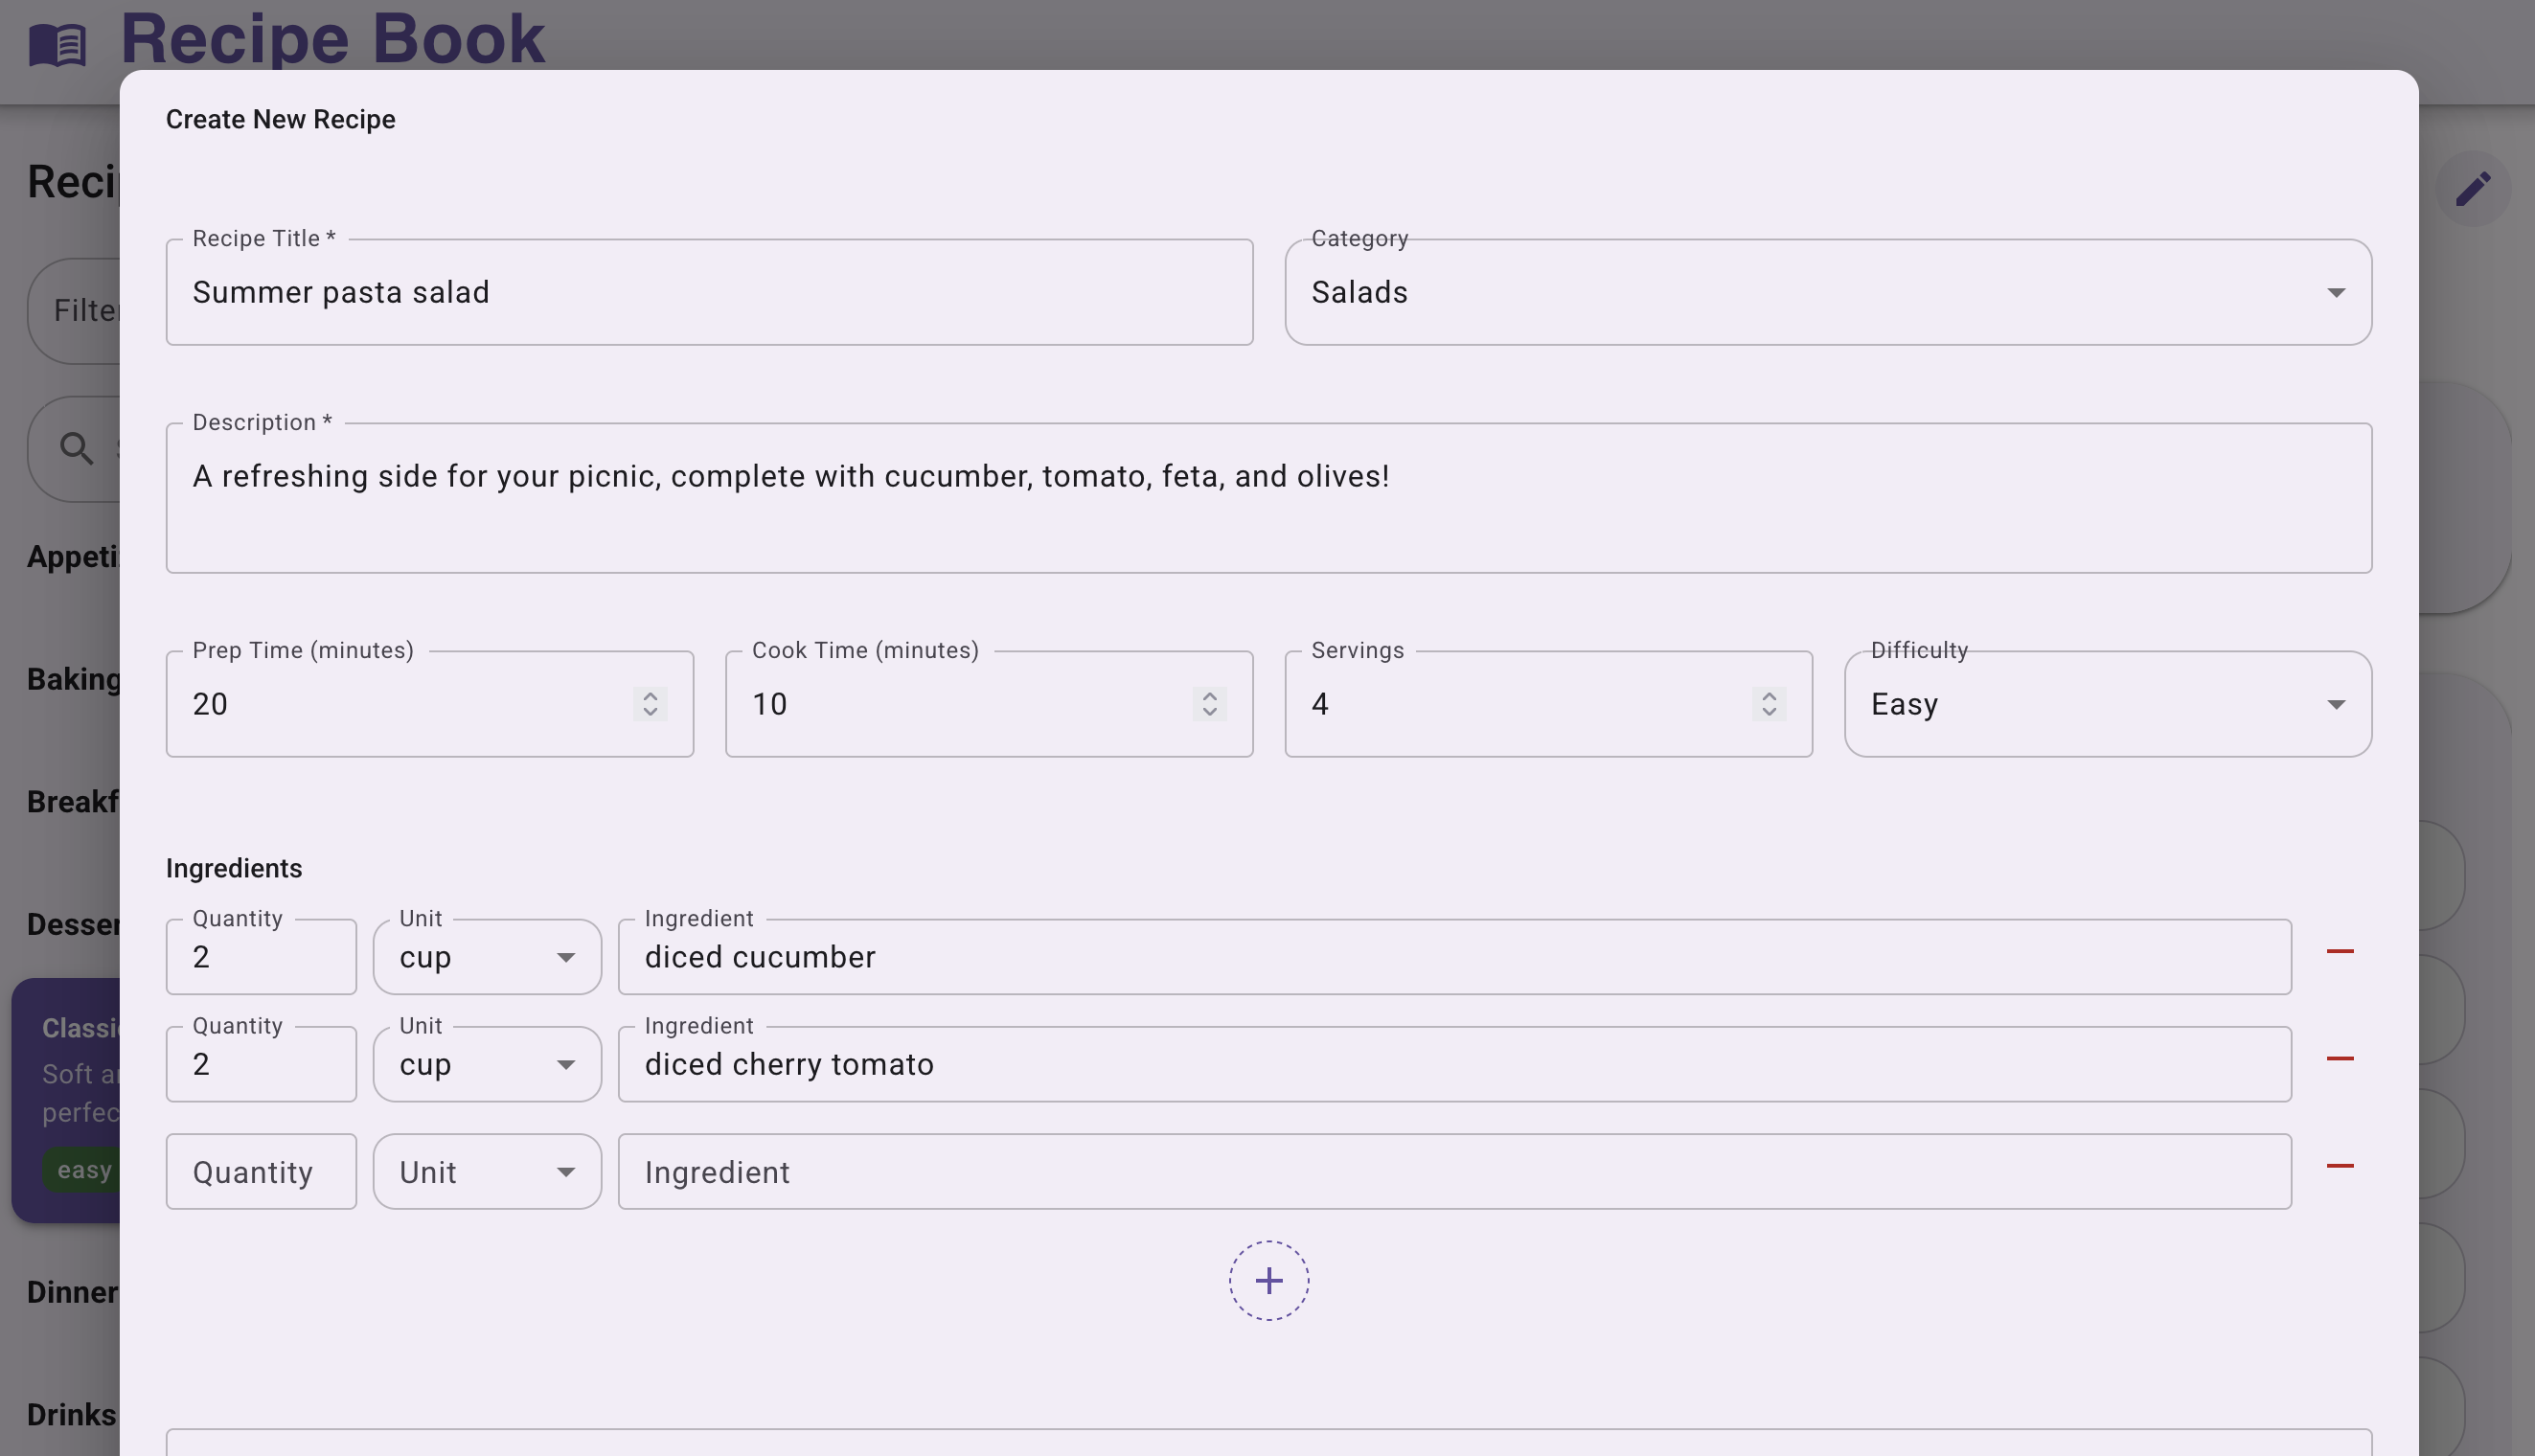
The MVP app was a personal recipe directory. The app would have two panes: the left displaying a list of all recipes by category, and the right showing the currently selected recipe. Users could add a new recipe by clicking the “+” button. They’d fill out fields such as name, prep time, cook time, description, and add ingredients to a dynamic list. These recipes would be added to the main database.
At this stage, there would be no auth system or search feature. In its initial state, it would function as a single-user, self-hosted recipe management system.
What I asked Claude Code
I combined the app’s concept with the architecture to write a semi-detailed, paragraph-long prompt. My goal here was to get the majority of the app built from this one prompt, so I could focus on smaller iterations going forward.
Build me an application with three services: a React frontend, a Django backend/API, and a Postgres database. Create a Docker Compose definition. Write Dockerfiles for the frontend and backend services, and pull a Postgres image for the database. This will be a personal recipe database app, where as a user, I can record and access my favorite cooking recipes. The layout should feature two panes: one with a list of my recipes, and another to feature the currently-selected recipe. Allow users to add a new recipe by clicking a button to reveal a modal. In the modal, include fields for recipe name, a dynamic list for ingredients and their measurements, cook time, prep time, description, and difficulty. Use Material Design 3 for the components and layout.
Pro tip: many developers report good results when asking an LLM to help them workshop their prompts.
Iterating and correcting
Claude Code guided me through every step of development, asking for permission before writing to files or executing commands. This first prompt took about five minutes for Claude to complete. Sometimes, Claude would make a mistake and correct itself, or it would reach a point that required a different architecture decision in order to continue.
After Claude finished building from my initial prompt, it had a few issues with the Docker config (particularly networking the frontend and backend together). Even though Claude confidently announced that the app was working, I had to correct it and feed it the logs from my browser’s networking tab. Sometimes it would take a few attempts for Claude to figure out what was wrong, but in the end it could course-correct well enough.
Requesting new features
I wanted to make the app more polished and feature-rich with Claude’s help. As recommended by Claude Code itself, I intended to keep these changes small-scale (just a few lines of code each, from a detailed prompt). I’m a huge proponent of trunk-based development, which is especially valuable when you’re using an LLM to make changes (meaning: things break often, and it’s best to minimize that blast radius).
For example, I wanted to add a feature to allow users to filter by categories. This involved a few changes:
- a database migration (adding the “category” field to every recipe)
- creating and seeding a new database with categories (dinner, snacks, breakfast, desserts, etc)
- a new field on the modal box that allows users to select a category from the dropdown
- updating the recipe constructor to accept the category selection
- the left sidebar sorting recipes under their respective categories
I broke it down into these steps for Claude, and viewed the results after every iteration. Claude Code can’t view your browser (yet), so it goes off of HTML fetch requests. Because of this, it can’t “see” what’s wrong, and thus sometimes it will claim the app is fully operational. You’re able to feed it a screenshot, or the logs. In my case, Claude was very close to getting the feature right, so I described the issues I was seeing:
The dropdown menu on the modal box is not populated with the categories from the category database. Can you find what's going wrong with that connection?
Claude was able to cycle through the relevant files and make a couple repair attempts. Before long, things were working, which I relayed to Claude. I used this same workflow to define a few other small features with decent success.
Defining a process for Claude Code
To de-risk my process, I wanted to push all commits into GitHub so I could version control my app. Since I already have GitHub configured locally, I told Claude the plan (and it confirmed permissions), and things were all set.
I defined a simple process for Claude to follow with every code change:
- make the code change
- run
docker compose up --build -d(rebuild Docker images, spin them up, and run in detached mode) - perform a fetch request to verify the code change
- if unsuccessful, go back to step 1
- make a git commit
- push the commit to the repo
Going forward, Claude followed these steps every time I asked it something that involved editing code. Once I start adding more features, I’ll ask Claude to work off of branches, so I can review its changes in pull request format, instead of in the Claude Code UI.
Implementing Docker best practices
Claude’s first (successful) Docker images turned out well: they were very similar to what you’d see in a 101-level Docker “how to” guide. That made total sense, since that likely represents the average Dockerfile in Claude’s training data.
I was curious to see how Claude responded when asked to improve them. Instead of specifying what I wanted it to change, I sent it a reference guide from the Docker docs:
Review and modify both Dockerfiles to implement principles from this guide: https://docs.docker.com/build/building/best-practices/
In one attempt, Claude Code redid the Dockerfiles from the ground up, adding healthchecks, a non-root user, and more layers.
See for yourself. Before:
FROM python:3.11-slim

WORKDIR /app

# Install system dependencies
RUN apt-get update && apt-get install -y \
    postgresql-client \
    && rm -rf /var/lib/apt/lists/*

# Copy requirements and install Python dependencies
COPY requirements.txt .
RUN pip install --no-cache-dir -r requirements.txt

# Copy project
COPY . .

# Create media directory
RUN mkdir -p media

# Expose port
EXPOSE 8000

# Run the application
CMD ["python", "manage.py", "runserver", "0.0.0.0:8000"]
And after:
FROM python:3.11-slim AS base

# Set environment variables for Python
ENV PYTHONDONTWRITEBYTECODE=1 \
    PYTHONUNBUFFERED=1 \
    PYTHONPATH=/app \
    PIP_NO_CACHE_DIR=1 \
    PIP_DISABLE_PIP_VERSION_CHECK=1

# Set working directory
WORKDIR /app

# Install system dependencies in a single layer
RUN apt-get update && apt-get install -y --no-install-recommends \
    curl \
    postgresql-client \
    && apt-get clean \
    && rm -rf /var/lib/apt/lists/* \
    && rm -rf /tmp/* \
    && rm -rf /root/.cache

# Create non-root user for security
RUN groupadd -r appuser && \
    useradd -r -g appuser -s /bin/false appuser

# Copy requirements first for better layer caching
COPY requirements.txt ./

# Install Python dependencies
RUN pip install --no-cache-dir --upgrade pip && \
    pip install --no-cache-dir -r requirements.txt

# Copy project files
COPY --chown=appuser:appuser . .

# Make initialization script executable
RUN chmod +x init_db.sh

# Create media directory with proper permissions
RUN mkdir -p media && \
    chown -R appuser:appuser media && \
    chown -R appuser:appuser /app

# Switch to non-root user
USER appuser

# Expose port
EXPOSE 8000

# Health check
HEALTHCHECK --interval=30s --timeout=10s --start-period=5s --retries=3 \
    CMD curl -f http://localhost:8000/api/ || exit 1

# Use exec form with shell script first
ENTRYPOINT ["sh", "-c", "./init_db.sh && python manage.py runserver 0.0.0.0:8000"]
It needs a few modifications, but this is pretty solid for now. I checked with my colleague (and Docker Captain) Nick, who was able to tell me how we could make this better. As a human, Nick has much more context into the quality of this spec. Claude is simply going off of the textual patterns it sees, while Nick has a real-world understanding of why Dockerfiles should follow certain principles, and when/where to apply them.
Improving the Dockerfile
With LLM-assisted coding, specific and targeted feedback is extremely important. It’s expected that the LLM’s output won’t be your final product anyway. Here’s some feedback from Nick to further improve Claude’s second try at the Dockerfile:
1. Be explicit in your versioning and image choice
Claude’s Dockerfile wasn’t using the latest Python image (as of June 2025). It’s also helpful to lock it down to a patch release (denoted in the number after the second decimal) to keep the build as reproducible as possible.
Alpine isn’t always the best choice because it uses the musl libc library which tends to be flaky, instead using the slim-bookworm image sets you up with a lightweight Debian.
This image is only a single stage, so we didn’t need to use the base stage name.
FROM python:3.13.5-slim-bookworm
2. Add a maintainer label
If you’re pushing your image to a registry, users might have questions/comments when running it (especially when they can’t access the source Dockerfile). This allows them to contact you in the event they have questions or need context.
LABEL maintainer="Natalie Lunbeck <natalie@shipyard.build>"
3. Combine commands for readability
There were three separate rm commands in Claude’s Dockerfile, which we can combine into one. The groupadd and useradd commands can also be combined into one line. This improves the build slightly by reducing the number of layers.
The --create-home flag ensures that a user has a home directory, so we can control where our packages are installed.
RUN apt-get update && apt-get install -y --no-install-recommends \
  curl \
  postgresql-client \
  && apt-get clean \
  && rm -rf /var/lib/apt/lists/* /tmp/* /root/.cache \
  && groupadd python && useradd --create-home --no-log-init python
4. Getting set up for the pip install
There are a couple things we can adapt to get the optimal install config from our pip statement. First, we can move the USER python line up, so that pip will install dependencies as non-root user. Next, we can remove the --upgrade pip flag, so that way we always have a stable pip version.
USER python

COPY --chown=python:python requirements.txt ./

RUN pip install --no-cache-dir -r requirements.txt
5. Managing your env vars
We can move the env vars further down in the Dockerfile, so we avoid invalidating the cache when we change their values. This way, Docker will only build from this layer down when we edit them (since we’re unlikely to edit anything above).
The Python path can go from \app to . since we’ve already set path to \app. Adding a local bin path makes binaries accessible to any packages that use a binary script. Now that pip has already run, we can remove any pip-related env vars too.
Some tools expect the USER env var to be set, so here we can explicitly declare it.
ENV PYTHONDONTWRITEBYTECODE=1 \
  PYTHONUNBUFFERED=1 \
  PYTHONPATH=. \
  PATH="${PATH}:/home/python/.local/bin" \
  USER=python
6. Use CMD instead of ENTRYPOINT
Instead of ENTRYPOINT, we’re better off using CMD so we can distinguish between this and a separate entrypoint script (if we choose to add that). We also want to use the array syntax so gunicorn runs as PID 1, instead of your shell.
Finally, using gunicorn to run the app is best practice because it is more neutral across dev and prod configurations, while runserver is aimed at development.
CMD ["gunicorn", "-c", "python:config.gunicorn", "hello.app:create_app()"]
Testing the app
Within maybe three hours, Claude Code had completed an MVP working app (with my guidance). Docker Compose compatibility was something I had requested from the very first prompt, and I kept it running locally throughout development.
I wanted to share my app with my colleagues, so they could poke around and give me some feedback. Conveniently, I work at Shipyard and have a great tool at my disposal for exactly this.
Shipyard uses a Compose file to handle config. I told Claude how to make this Shipyard-enabled, by directing it to the Shipyard docs:
I want to run this app on Shipyard. In order to do so, my services need Shipyard routes configured in the Docker Compose file. We'll want one for the frontend, and one for the API, using the correct filepath. Here's info on adding Compose labels: https://docs.shipyard.build/docker-compose#shipyardroute
Claude worked its magic, adding the correct labels. I created a new Shipyard application, and was able to see my app live on the first try!
Sandbox environments for Claude Code
When you’re in flow building and testing with Claude Code, you’ll want to preview your code changes on real infrastructure. Shipyard’s managed ephemeral environments make this simple: just connect your GitHub or GitLab. Now every time Claude commits to your repo, Shipyard will reflect those changes in an ephemeral environment with all your services and data. You can share this environment with stakeholders and run your test suite against it. Shipyard helps improve developer experience and mitigate risk when it comes to GenAI-assisted coding. You’ll code faster than ever and trust every code change. Try it free for 30 days and start building in minutes.